Anthro-esque DIY Dollar Store Business Card Box
It's been a while since I've done a "Look What I Found at the Dolla Store" feature, so although this is just one item, let's add this to the list! If you can't find these at your local dollar store I'm pretty sure Michaels will have something similar, so save your coupons and make it a cheap "almost dollar store" buy.
Of course, it does require a bit of transformation to get it to it's final state, but it's an easy project.
When I came across these little boxes at Dollar Giant, they instantly reminded me of something I may find in an Anthropologie or a a stationery store. They are the perfect size for holding business cards on your desk, but I'm sure you could think of a million other things you could put in them. Lipstick. Coins. Tea Bags.
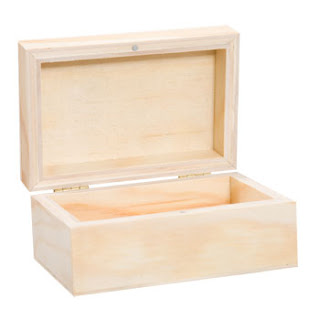
I bought both a rounded edge box, and a squared edge box, but I'll save the latter for another post! I didn't take a before photo (bad blogger!) but I found the square edged box on the Dollar Tree website.
I adapted the "recipe" for this since it's a small teeny tiny box. I used just one teabag, not steeped for more than a few minutes. I also used one steel wool pad, just a cup of vinegar, and let that sit for just about 12 hours (the longer this mixture sits, the darker your wood will be).
It's such an easy and painless "painting" process because you're just dousing the box in liquid and there's no such thing as drips or a messy paint job. Do make sure you cover the entire box in both solutions though. Whatever you don't will remain the unfinished wood colour. Make sure to let the box dry between the tea and vinegar mixtures, and then let it fully dry before adding any other paint embellishments.
I thought the box could use a bit more panache, so I put my Silhouette to use and made my first ever stencil. I used vinyl, but I think next time I might try some of my thicker adhesive cardstock as the vinyl was a touch tricky to stencil with.
Of course, it does require a bit of transformation to get it to it's final state, but it's an easy project.
When I came across these little boxes at Dollar Giant, they instantly reminded me of something I may find in an Anthropologie or a a stationery store. They are the perfect size for holding business cards on your desk, but I'm sure you could think of a million other things you could put in them. Lipstick. Coins. Tea Bags.
I've painted enough wooden craft boxes in my lifetime to fill a room. I'm sure I'm not alone here, right? Every time I see one, I paint it, thinking it's going to look absolutely amazing and I will be able to display it for all the world to see. Truth is, it usually looks just like a cheap wood box painted with craft paint, and it usually ends up inside a cabinet somewhere playing home to my chequebooks and reciepts. Out of sight. This time, I wanted to do something different, so out with the paint, and in with the "homemade old wood" recipe!
I adapted the "recipe" for this since it's a small teeny tiny box. I used just one teabag, not steeped for more than a few minutes. I also used one steel wool pad, just a cup of vinegar, and let that sit for just about 12 hours (the longer this mixture sits, the darker your wood will be).
It's such an easy and painless "painting" process because you're just dousing the box in liquid and there's no such thing as drips or a messy paint job. Do make sure you cover the entire box in both solutions though. Whatever you don't will remain the unfinished wood colour. Make sure to let the box dry between the tea and vinegar mixtures, and then let it fully dry before adding any other paint embellishments.
I thought the box could use a bit more panache, so I put my Silhouette to use and made my first ever stencil. I used vinyl, but I think next time I might try some of my thicker adhesive cardstock as the vinyl was a touch tricky to stencil with.
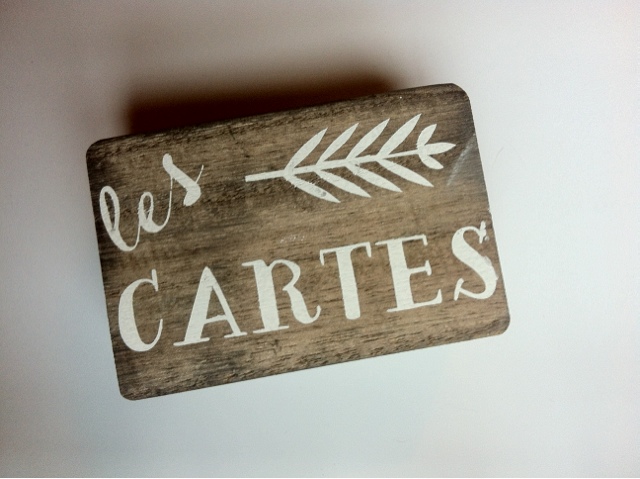
And par ce que everything sounds better in french, I decided to stencil "les cartes" instead of just "cards". Way more fun. Who knows if the French even refer to business cards as "les cartes", but it has a nice ring to it, mais non?
I just used a white craft paint to stencil with my Martha Stewart plopping sponges ( or whatever they're called). After the paint dried, I gave it a quick sand to add to that aged look, and then did a single coat of water-based poly. You'll see in the photo below that the sanding was also necessary because clearly I'm not a great stenciller.
And the verdict? I'm obsessed. I may only have a need for one business card holder, but I seriously want to go buy and refinish ten of these right now. They are just so stinking cute, and at $1.25 each, are about the cheapest bit of lovely I own right now. And with my new business cards being printed as we speak, I'm even more excited to bring them home and store them in a sweet place they can call their own.


Love Love LOVE this! I think I need to have business cards made just so I can make one! And "les cartes" is way better than "cards." Good call :) Have a great weekend!
ReplyDeleteThis looks fabulous Jen! I've never tried the aging wood with tea/vinegar technique but I love the results everyone is getting from it. I think the next Silhouette sign I make needs to incorporate some sort of wood stain instead of just paint.
ReplyDeleteAs for using vinyl for stencils, I can totally relate to your experience. I do everything I can to avoid using vinyl for any of my projects. I find it really slippery and greasy on whatever surface I use it on which results in less than crisp stencilling. That's fine if you're going to distress it, but if you don't have that to fall back on it's very frustrating! My recommendation will always be contact paper for stencils. It sticks much better, it's cheaper and the roll is often wider than vinyl so you can make bigger things. If you're just peeling it off anyway, save your money :)
Happy to see another cheap-turned-chic project courtesy of you!
Simple and elegant design that mesmerizes others and makes you prominent from others and saves card from crumbling....
ReplyDeleteSimple and elegant design....
ReplyDeletePrinting On Plastic
All these are lovely cards.Thanks for this great share.
ReplyDeleteplastic business cards