
A Pinteresting Table Top
Happy Halloween lovelies!
Hope everyone on the East Coast is safe and sound today and know that everyone affected is in my thoughts and prayers.
Today I am finally bringing some details on my new table, a project that many of you helped me with!
Although I had already spent $100 on materials on a first failed attempt, I gave it another go. I had seen a pin on Pinterest where someone was able to build a new tabletop for $33, and that was my initial "Pinspiration". Despite living in a Canadian province where forestry and lumber is one of our main industries, apparently our wood at Home Depot is much more pricey than my magical friend's in Pinterestland. Again, the supplies (wood, filler, and brackets) cost over $100, but this time I had my handy father-in-law to help, so I was sure it was going to work out this time.
And it did!

I am so very in love with it. It doesn't have the "plank" look that I was going for the first time around, but I think the flush "butcher block" look of what we went for not only compliments the chrome base, but will also be easier to clean and maintain.

I will have to get back to you with the actual construction of the table top, because, unlike some of my superbuilder blogger friends, I am admittedly not a very good furniture builder.

What I did do, however, was go back to Pinterest to find a treatment I had seen back a few months ago. It was a process to created an aged, weathered wood stain for new wood using (mostly) household ingredients. I was happy to try it out knowing that if it didn't work, I could sand and stain or paint the table top without too much worry. I was also excited to take some sort of part in the completion of this table, albeit a small and easy task.

Let the tea dry throroughly (which it will because you have to wait 24 hours for the steel wool/vinegar mixture), and then paint on a coat of that mixture. It's amazing how the reaction takes place before your eyes. The colour develops right away, and changes over the next day or two as it dries. I found that it went from a light grey, to a rich grey brown, to a lighter grey, and then settled on a light greyish brown.

I used this treatment on a wooden wine crate, however it was 5 days later so the "solution" had a lot of time to think and react. The wine crate turned DARK brown. Like espresso brown. It was not the look I was going for, but worth it to note that if you are looking for a deeper colour, just let your wool/vinegar solution sit a bit longer.

I was hoping for more grey, however I have warmed up to the warm colours in the wood. As my husband pointed out, we have a lot of "cool" in our home, and it's nice to juxtapose that with some warmth. I think, for once, he's right.
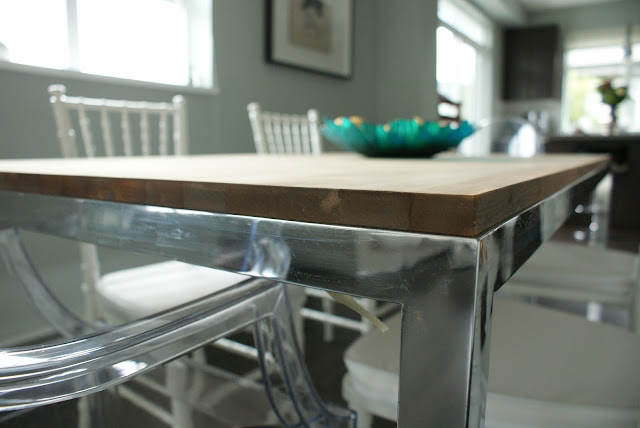
The next step was to sand it a couple of times and coat with water based polyurethane which again changed the colour slightly. I will have to update with photos coming up because it's pretty gloomy out right now and I couldn't get any good photos.
This may have been a day late, but gratefully linking up to The Pinterest Challenge at YHL.

And make sure to check out Katie, Carmel, and Sarah to see what they've tackled for their Pinterest challenge!

Hope everyone on the East Coast is safe and sound today and know that everyone affected is in my thoughts and prayers.
Today I am finally bringing some details on my new table, a project that many of you helped me with!
And it did!

I am so very in love with it. It doesn't have the "plank" look that I was going for the first time around, but I think the flush "butcher block" look of what we went for not only compliments the chrome base, but will also be easier to clean and maintain.

I will have to get back to you with the actual construction of the table top, because, unlike some of my superbuilder blogger friends, I am admittedly not a very good furniture builder.

What I did do, however, was go back to Pinterest to find a treatment I had seen back a few months ago. It was a process to created an aged, weathered wood stain for new wood using (mostly) household ingredients. I was happy to try it out knowing that if it didn't work, I could sand and stain or paint the table top without too much worry. I was also excited to take some sort of part in the completion of this table, albeit a small and easy task.
Although I had never purchased steel wool before, I found 000 steel wool in an aisle near the paint department in Walmart. I ripped it up into little pieces, put it in a mason jar, and covered with a whole litre of white vinegar. You're supposed to let is sit for 24 hours, so during this time, I did the first "coat", which is steeped, chilled tea.
I used 2 cups water and 2 earl grey tea bags. Once cooled, I painted it on. It doesn't change the colourof the untreated wood much, but is a necessary step in creating the aged wood look.

Let the tea dry throroughly (which it will because you have to wait 24 hours for the steel wool/vinegar mixture), and then paint on a coat of that mixture. It's amazing how the reaction takes place before your eyes. The colour develops right away, and changes over the next day or two as it dries. I found that it went from a light grey, to a rich grey brown, to a lighter grey, and then settled on a light greyish brown.

I used this treatment on a wooden wine crate, however it was 5 days later so the "solution" had a lot of time to think and react. The wine crate turned DARK brown. Like espresso brown. It was not the look I was going for, but worth it to note that if you are looking for a deeper colour, just let your wool/vinegar solution sit a bit longer.

I was hoping for more grey, however I have warmed up to the warm colours in the wood. As my husband pointed out, we have a lot of "cool" in our home, and it's nice to juxtapose that with some warmth. I think, for once, he's right.

The next step was to sand it a couple of times and coat with water based polyurethane which again changed the colour slightly. I will have to update with photos coming up because it's pretty gloomy out right now and I couldn't get any good photos.
This may have been a day late, but gratefully linking up to The Pinterest Challenge at YHL.
And make sure to check out Katie, Carmel, and Sarah to see what they've tackled for their Pinterest challenge!


I'm so glad it worked out for you this time! The results are fantastic, I love the mix of the rustic wood with glam chrome. Totally awesome in every way!
ReplyDeleteWhy thank you! ANd thank you for your awesome input!
DeleteIt looks AWESOME!!! Love it, and you are so right about the slats being hard to clean. It worked out for the best :)
ReplyDeleteTrue true! It did work out for the best. I really like it this way!
DeleteWhat kind of wood did you use, and how thick? And where from? Tell me moooooore :) I'm brainstorming an idea for my sister's new place...
DeleteLooks amazing!! I love the warm wood tones mixed with the chrome base. Great job!
ReplyDeleteThanks Sarah!
Delete