
Healthy Home | Growing Greens to Save Some Green
No, not THAT kind of green. I know it's easy to generalize because I do live in BC, but that is NOT me, friends!
The kind of greens I'm growing are of the broccoli variety. Broccoli sprouts to be exact.

I also do not have a green thumb. At all.
But, when I heard that broccoli sprouts have 50 times the nutrition of broccoli, and that their seeds were ridiculously easy to sprout, I just couldn't say no.

According to my new obsession, Dr. Greger from NutritionFacts.org, broccoli sprouts have the biggest nutritional bang for your buck. For about 25 cents, you can have a cup of uber nutritious, freshly grown broccoli sprouts. Check out the video here. (PS, I am not affiliated with Nutrition Facts or Dr. Greger in any way whatsoever, I just LOVE the way nutritional studies are presented on that website and have found it the most useful resource in my constant quest for better health).
The number one reason I decided to give it a go is because I eat a lot of greens. I spend a lot of money on organic greens to make salads and to blend in with my smoothies, so I am constantly heading to the store and spending money I'd rather spend on future window treatments. So what did I have to lose?

One tablespoon of seeds yields two cups of broccoli sprouts which is nutritionally equivalent to 50 cups of broccoli. Yup, that's what I call a superfood. Oh, and that 2 cups cost 50 cents, so if you're looking at it per pound of broccoli nutrition as Dr. Gregor states, that's like 1 penny per pound of broccoli.
What do they taste like? Quite a lot like raw broccoli, with a little spicy radish kick. Do I crave them like I crave chocolate? Nope, no sireee. But they are great as a base to my salad and added to wraps and sandwiches. I am now forever a sprout convert.
Want to learn how you can sprout to?

1. Buy some organic broccoli seeds. I got mine from a great Canadian company called Mumms. They ship to the US as well, with free shipping on orders over a certain value. Expect to pay about $20 per pound (about 75- 80 cups of brocoli sprouts). I ordered the 2 pound bag for $40 with free shipping and went halfers with a friend so we could both give it a go.
2. Get your screen. I bought actual screen used to make window screens at HomeDepot. It was $10 for a big roll, so I will have screens for the rest of my lifetime. I also split this with a friend because there was just so much of it.

3. Measure one tablespoon of seeds into a 2-cup (standard size) mason jar. Cut a small screen and secure to the top using an elastic band or the original canning ring. (Alternatively, you can put two tbsp in a four-cup large mason jar if you want a lot of sprouts).
4. Almost fill with cold water, swirl around, and drain. Fill half again with cold water, and let soak for TWO hours.
5. Drain again, rinse again. When draining after that rinse, drain on a 45 degree angle so your seeds rest along the side of the mason jar from top to bottom. Rest your jar, screen side down, on something with a 45 degree angle. I used a white dish I had, but I've seen online where people use dish drying racks. I like my version because it's a little less ugly to look at day in day out.

6. Rinse, drain, repeat every 12 hours. I'm on an 8:00 AM/ 8:00 PM schedule so I never forget. Add in additional jars every day if you like, so you can have four or five jars on the go and have fresh greens every. single. day.

7. Once that two-cup mason jar is looking pretty full, it's time to harvest. I take the screen off, pull out my sprouts and stick them in a large mixing bowl. Cover with water to de-hull. The little brown seed guys that are now empty will float to the top. There a few ways to do this, but I generally just fill the bowl with cold water then push my hand on the sprouts so the hulls float to the surface, and then dump the water out. Do this a few time and most will be gone.
8. Put the wet sprouts back in your jar with the screen and shake out the excess water. Put back on your draining system for a couple of hours, and then enjoy your fresh, LIVE and GROWING greens packed with antioxidants, phytonutrients and other cancer fighting properties. You can also move them to the fridge in a storage container where they will be fresh for a few days.
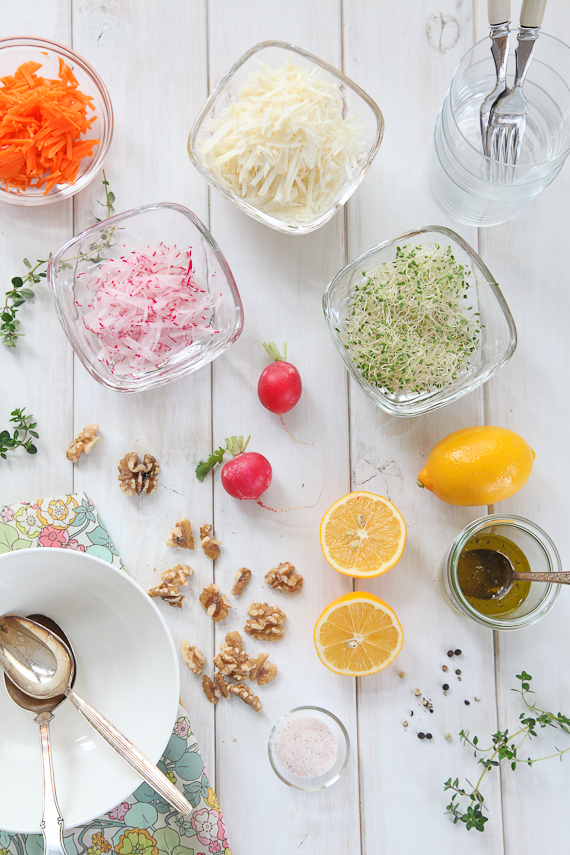
There are so many yummy salads out there you can make, and just replace the green mix with sprouts! I love the one in the photo at the top of the page. Check out that recipe right here.
For more information on why to sprout, and what the benefits are, check out this post.
I hope you give it a go! This is one of those "Why haven't I ever tried this before?" moments for me. It's easy, inexpensive, and nutritious!
The kind of greens I'm growing are of the broccoli variety. Broccoli sprouts to be exact.
Let's preface this with I am not a hippie, a hipster, nor a granola-loving, Birkenstock wearing tree hugger (nothing wrong with them, I'm just not one, although my hubby seems to think I'm on my way).
I also do not have a green thumb. At all.
But, when I heard that broccoli sprouts have 50 times the nutrition of broccoli, and that their seeds were ridiculously easy to sprout, I just couldn't say no.

According to my new obsession, Dr. Greger from NutritionFacts.org, broccoli sprouts have the biggest nutritional bang for your buck. For about 25 cents, you can have a cup of uber nutritious, freshly grown broccoli sprouts. Check out the video here. (PS, I am not affiliated with Nutrition Facts or Dr. Greger in any way whatsoever, I just LOVE the way nutritional studies are presented on that website and have found it the most useful resource in my constant quest for better health).
The number one reason I decided to give it a go is because I eat a lot of greens. I spend a lot of money on organic greens to make salads and to blend in with my smoothies, so I am constantly heading to the store and spending money I'd rather spend on future window treatments. So what did I have to lose?

One tablespoon of seeds yields two cups of broccoli sprouts which is nutritionally equivalent to 50 cups of broccoli. Yup, that's what I call a superfood. Oh, and that 2 cups cost 50 cents, so if you're looking at it per pound of broccoli nutrition as Dr. Gregor states, that's like 1 penny per pound of broccoli.
What do they taste like? Quite a lot like raw broccoli, with a little spicy radish kick. Do I crave them like I crave chocolate? Nope, no sireee. But they are great as a base to my salad and added to wraps and sandwiches. I am now forever a sprout convert.
Want to learn how you can sprout to?

1. Buy some organic broccoli seeds. I got mine from a great Canadian company called Mumms. They ship to the US as well, with free shipping on orders over a certain value. Expect to pay about $20 per pound (about 75- 80 cups of brocoli sprouts). I ordered the 2 pound bag for $40 with free shipping and went halfers with a friend so we could both give it a go.
2. Get your screen. I bought actual screen used to make window screens at HomeDepot. It was $10 for a big roll, so I will have screens for the rest of my lifetime. I also split this with a friend because there was just so much of it.

3. Measure one tablespoon of seeds into a 2-cup (standard size) mason jar. Cut a small screen and secure to the top using an elastic band or the original canning ring. (Alternatively, you can put two tbsp in a four-cup large mason jar if you want a lot of sprouts).
4. Almost fill with cold water, swirl around, and drain. Fill half again with cold water, and let soak for TWO hours.
5. Drain again, rinse again. When draining after that rinse, drain on a 45 degree angle so your seeds rest along the side of the mason jar from top to bottom. Rest your jar, screen side down, on something with a 45 degree angle. I used a white dish I had, but I've seen online where people use dish drying racks. I like my version because it's a little less ugly to look at day in day out.


7. Once that two-cup mason jar is looking pretty full, it's time to harvest. I take the screen off, pull out my sprouts and stick them in a large mixing bowl. Cover with water to de-hull. The little brown seed guys that are now empty will float to the top. There a few ways to do this, but I generally just fill the bowl with cold water then push my hand on the sprouts so the hulls float to the surface, and then dump the water out. Do this a few time and most will be gone.
8. Put the wet sprouts back in your jar with the screen and shake out the excess water. Put back on your draining system for a couple of hours, and then enjoy your fresh, LIVE and GROWING greens packed with antioxidants, phytonutrients and other cancer fighting properties. You can also move them to the fridge in a storage container where they will be fresh for a few days.
There are so many yummy salads out there you can make, and just replace the green mix with sprouts! I love the one in the photo at the top of the page. Check out that recipe right here.
For more information on why to sprout, and what the benefits are, check out this post.
I hope you give it a go! This is one of those "Why haven't I ever tried this before?" moments for me. It's easy, inexpensive, and nutritious!


That is amazing.... 50 times the nutrition?!!! My daughter is always growing those little sprout-haired-head-things in kinder, obviously I need to start eating them instead of throwing them away!
ReplyDeleteladybear.me
Yes, eat them! SO healthy!
DeleteSo glad you shared this! Looks so easy and I love the nutrition and money savings facts.
ReplyDeleteYup, it's a win win if I ever knew one!
DeleteI LOVE THIS! Thank you for the post. I have always been a fan but recently there have been problems with sprouts and bacteria so I've shied away from them. With this information - I am back on the bandwagon!! This is also a great idea for a school project/garden because the kids can really see quick results. Thanks again...
ReplyDeleteDonya
www.asouthern-soul.blogspot.com
I'm with you on that. Not a fan of buying them already sprouted, but DIY-ing it is the way to go! I would still stay away from sprouting alfafa though...
Delete